Options
Applies to version: Version 5.x, Version 6.x
In this area it is possible to change settings set in the configuration wizard and to adapt SimpleSYN to your personal needs.
 All modifications will only be adopted after a click on “Save”. Click on “Back” or leave the options through another menu entry to discard made modifications to the settings.
 Image 1: Options
Profile selection
SimpleSYN can be configured independently for every Outlook® profile. The settings of SimpleSYN only apply to the active Outlook® profile.
In the default settings SimpleSYN uses the Outlook® standard profile. Alternatively it is possible to select any other profile for synchronizing.
The following settings can be made for the profile selection:
- Use default profile: SimpleSYN uses the Outlook® default profile. A dialog for profile selection is shown in the case of no standard profile being available.
- Use following profile: SimpleSYN uses the profile selected in the drop-down list.
- User selection: If neither “Use default profile” nor “Use following profile” is selected, the profile can be selected manually at each start of SimpleSYN. This is especially helpful if swapping between several profiles for synchronization is needed.
Selection neither the check box “Use default profile” nor “Use following profile” leads to a dialog for profile selection appearing at the start of SimpleSYN. Keep in mind that the configuration depends of the currently selected profile.
 Image 2: Select profile
All further settings under “Options” are based on the selected Outlook® profile. Changes of the profile selection result in according actualizations of the remaining fields.
Start
Here it is possible to define whether SimpleSYN is to be started automatically with Windows®. Activate the check box “Start with Windows” to automatically start SimpleSYN together with Windows.
Client / Server
Here definition whether SimpleSYN is to be run as SimpleSYN server or as SimpleSYN client is possible.
It is absolutely necessary to configure one computer as SimpleSYN server. The SimpleSYN server is the central contact point and forwards the items for synchronization to all SimpleSYN clients.
Check the radio button “This is the SimpleSYN server” if no SimpleSYN server has been configured before.
Check the radio button “This is a SimpleSYN client” if this SimpleSYN installation is to be connected to an existing SimpleSYN server.
SimpleSYN-server settings
When the radio button “This is the SimpleSYN server” has been selected, SimpleSYN is being run as server.
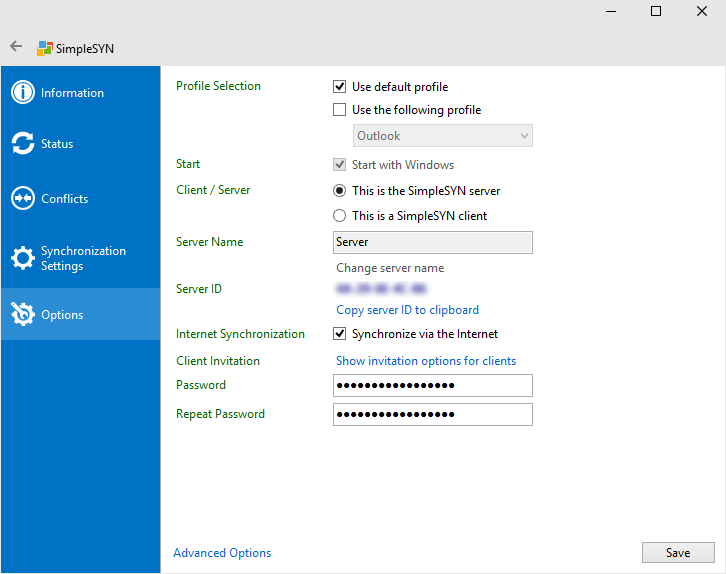 Image 3: SimpleSYN-server settings with Peer Name Resolution Protocol
Server Name
The SimpleSYN server will be listed on the SimpleSYN clients with this name. In the default settings SimpleSYN uses the current computer name as name for the SimpleSYN server. It is possible to freely choose the SimpleSYN server name. Click on “Change server name” to enter a custom name. It is also possible to add a short comment about the SimpleSYN-server.
If “Change server name” is not enabled, the SimpleSYN server has been published. Click on “Show invitation options for clients” and choose “Revoke Published server”.
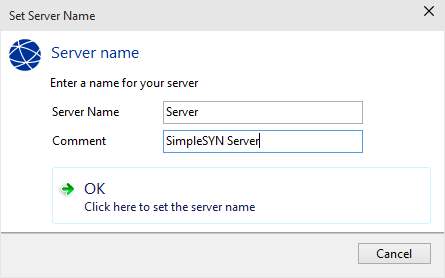 Image 4: Set SimpleSYN-server password
Server ID
Each SimpleSYN server gets a unique server ID. A SimpleSYN client can connect to the SimpleSYN server with this ID, if the SimpleSYN server cannot be found automatically.
Internet Synchronization
Internet synchronization is only available in the SimpleSYN business version.
Select the checkbox “Synchronize via the Internet” if you want to synchronize with this SimpleSYN server via the Internet.
Invite Clients
To enable SimpleSYN clients to access your SimpleSYN server, click “Show invitation options for clients”. This allows you to create a unique server ID or an invitation file to invite clients.
Communicate the server ID along with the server password to your SimpleSYN clients for example by e-mail or phone. An invitation file can be forwarded for example on a USB-stick or via e-mail to your SimpleSYN clients.
With this data the SimpleSYN client can connect to the SimpleSYN server.
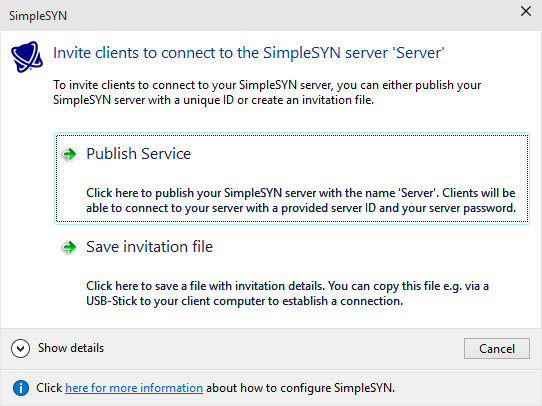 Image 5: Publish SimpleSYN-server
Publish Server
Click on “Publish Service” to retrieve a unique server ID. Communicate the server ID along with the server password to your SimpleSYN clients for example by e-mail or phone. With this data the SimpleSYN client can connect to the SimpleSYN server.
Revoke publication
It is possible at all times to cancel the publication of your SimpleSYN server. Thereunto click again onto “Show invitation options for clients” and subsequently on “Revoke server publication”. The server ID will be invalid afterwards.
Save invitation file
Alternatively it is possible to save an invitation file. Forward the invitation file for example on a USB-stick or via e-mail together with your server password to your SimpleSYN clients.
If the possibility to establish the SimpleSYN clients in the same network as your SimpleSYN server exists, it is unnecessary to either save an invitation file or to publish the SimpleSYN server. The SimpleSYN client will locate the server automatically in the local network.
Password / Repeat Password
The SimpleSYN server is being protected through a password against non-authorised access. Enter a password into the field “Password”. To avoid a faulty insertion, the password has to be entered in the field “Repeat Password” again.
SimpleSYN-client settings
When the radio button “This is a SimpleSYN client” has been selected, SimpleSYN is being run as client.
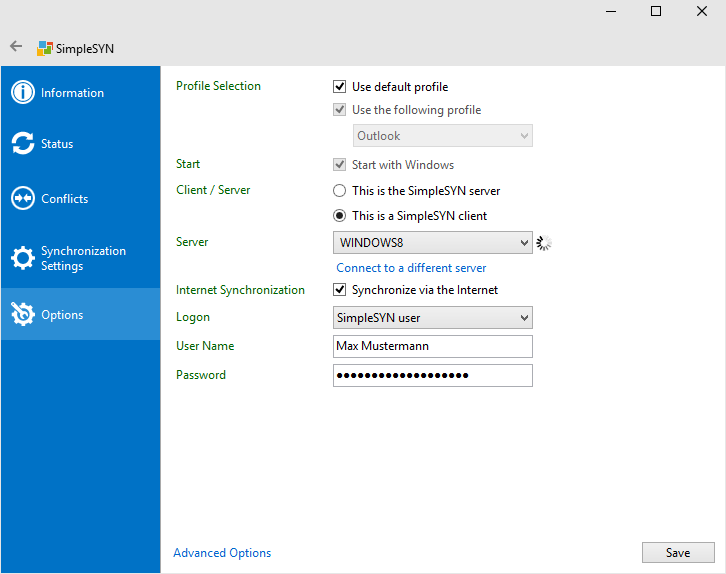 Image 6: SimpleSYN client-settings
Server
All SimpleSYN servers available in the local network and all servers found by ID or invitation file are listed in the "Server" drop-down list. Select the SimpleSYN server with which you want to synchronize the SimpleSYN client. To update the list of available SimpleSYN servers, put the input focus on the drop-down list and hit the key „F5“.
Note: Version 6 always also shows the previously configured server name.
If the SimpleSYN server you want to synchronize with is not available in the drop-down list, click on “Connect to a different server"
Connect to a different server
If the SimpleSYN server is not located in the same local network, you need a server ID or an invitation file to establish a connection.
Click on “Connect to a different server”.
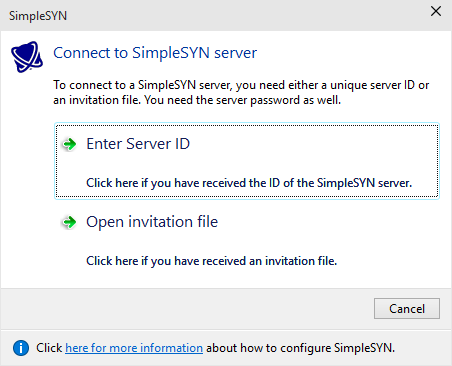 Image 7: Connect to a SimpleSYN-server
If you have received a server ID, click on “Enter Server ID” and type in the ID. Afterwards the server information will be retrieved and added to the drop-down list.
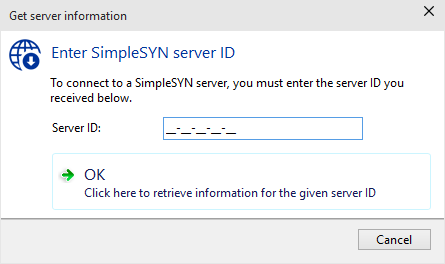 Image 8: Enter server ID
If you got an invitation file, click on “Open invitation file”. The SimpleSYN server will be added to the drop-down list.
Internet Synchronization
Internet synchronization is only available in the SimpleSYN Business version.
Select the checkbox “Synchronize via the Internet” if a connection to a SimpleSYN server via the Internet exists or will be used for synchronization in the future.
Logon
In the drop-down list “Logon” you can choose the authentication type used by SimpleSYN. Choose the authentication type as configured on the SimpleSYN server. In the default settings select “Default” i.e. all SimpleSYN clients will use the same configuration.
More information about the authentication types can be found here.
User Name, Domain and Password
Depending on the authentication type several input fields will be shown.
Enter the user name, domain and password of your SimpleSYN server into the fields “User name”, “Domain” and “Password”.
The default configuration will use the authentication type “Default”. In this case only the password must be entered.