Options
Applies to version: Version 7.x
In this section, you can customize the settings made by the configuration wizard and optimally adapt SimpleSYN to your personal requirements.
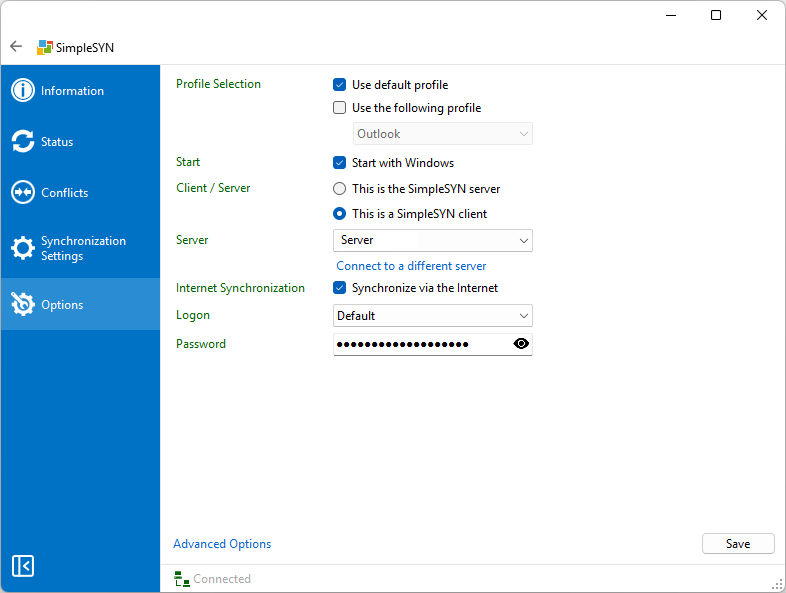 Image 1: Options
Profile selection
By default, SimpleSYN uses the standard Outlook® profile. Alternatively, you can select a different profile for synchronization.
You have the following options to choose your desired profile:
- Use default profile: SimpleSYN automatically uses the default Outlook® profile. If no default profile is available, a dialog will appear for manual selection.
- Use the following profile: The profile selected from the dropdown list will be used.
- Select profile at each startup: If neither of the previous options is selected, you can manually choose the desired profile each time SimpleSYN starts. This setting is especially useful if you regularly switch between multiple profiles to synchronize them one after the other
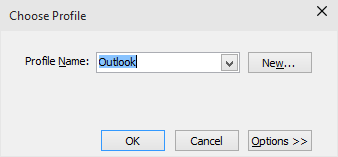
Image 2: Select profile
Start
Here you can define whether SimpleSYN should start automatically with Windows®. Activate the checkbox “Start with Windows” to have SimpleSYN launch automatically together with Windows.
Client / Server
In this section, you define whether SimpleSYN should run as a server or client on this computer.
Configuring a SimpleSYN server is essential, as it acts as the central instance and distributes the data to be synchronized to all connected clients.
- Select “This is the SimpleSYN server” if you have not yet set up a server and want this computer to serve as the central synchronization point.
- Select “This is a SimpleSYN client” if you want this installation to connect to an existing SimpleSYN server.
SimpleSYN-server settings
If you have selected the option “This is the SimpleSYN server”, SimpleSYN will operate as a server on this computer. The server takes on the central role in the synchronization network and distributes the data to all connected clients.
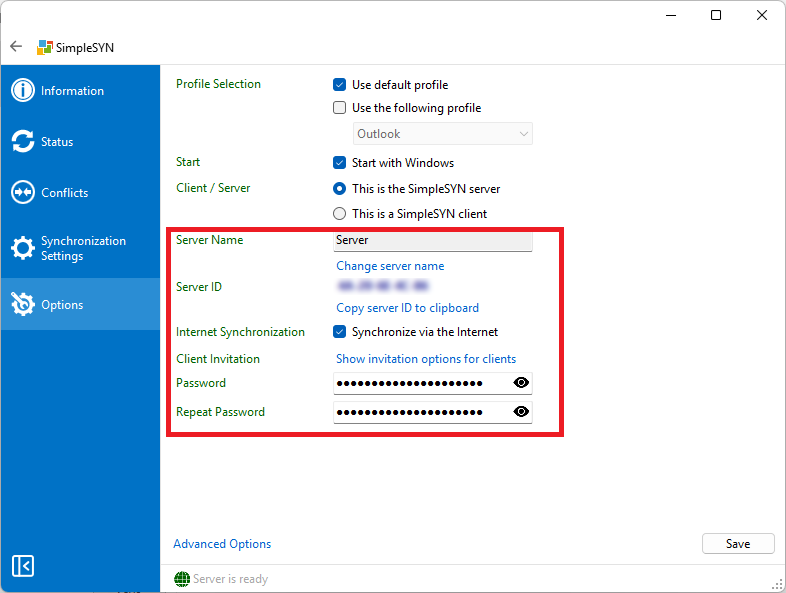 Image 3: SimpleSYN-server settings with Peer Name Resolution Protocol
Server Name
The SimpleSYN server will be displayed on clients under the name specified here. By default, SimpleSYN uses the current computer name as the server name.
However, you can freely choose a custom name for the server. Click “Change server name” to set an individual name. Additionally, you have the option to add a short comment about the server – for example, describing its function or location.
If the “Change server name” button is not available, the SimpleSYN server has already been published. To change the server name anyway, you must first revoke the publication:
- Click “Show options for inviting clients”.
- Then select “Revoke publication”.
After that, editing the server name will be possible again.
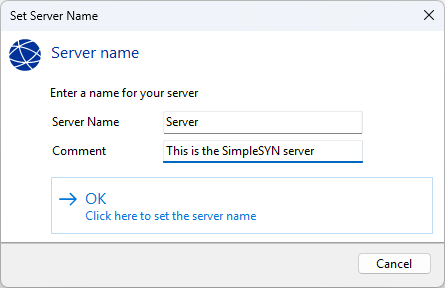 Image 4: Set SimpleSYN-server password
Server ID
Each SimpleSYN server automatically receives a unique server ID. This ID is used to connect SimpleSYN clients to the corresponding server.
Internet Synchronization only SimpleSYN Business
If you want to synchronize your data not only within the local network (LAN/Wi-Fi) but also over the Internet, activate the checkbox “Synchronize via the Internet.” This allows SimpleSYN clients to connect to the server even when they are outside your local network.
Invite Clients
To allow SimpleSYN clients to access your server, click “Show invitation options for clients”.
There you can either:
- Retrieve a unique server ID, or
- Create an invitation file.
Share the server ID along with the server password with your clients, for example via email or phone. Alternatively, you can transfer the invitation file – also together with the server password – via USB stick or email.
With this information, the SimpleSYN client can connect to the server and start synchronization.
- Publish server
- To receive a unique server ID, click “Publish server”. Share this server ID along with the server password with your SimpleSYN clients – for example via email or phone.
- Revoke published server
- If the server has already been published, you can revoke the publication at any time. This will invalidate the current server ID.
- Click “Show invitation options for clients”.
- Then select “published server”.
- If the server has already been published, you can revoke the publication at any time. This will invalidate the current server ID.
- Save invitation file
- As an alternative to the server ID, you can create an invitation file. This file contains all necessary information to connect to the server. Share the invitation file – together with the server password – with your clients, for example via USB stick or email.
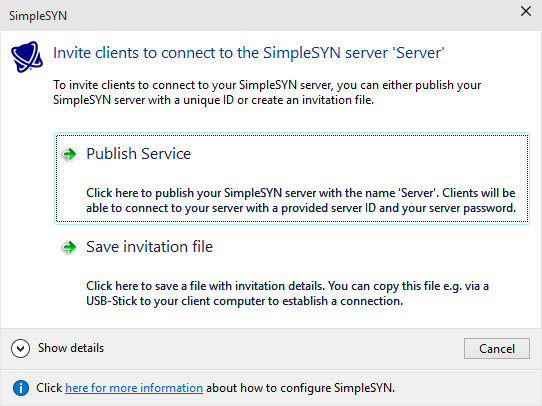 Image 5: Publish SimpleSYN-server
Password / Repeat Password
To protect the SimpleSYN server from unauthorized access, set a password by entering it in the “Password” field. To avoid typing errors, enter the same password again in the “Repeat password” field.
SimpleSYN-client settings
If the option “This is a SimpleSYN client” is selected, SimpleSYN will operate as a client.
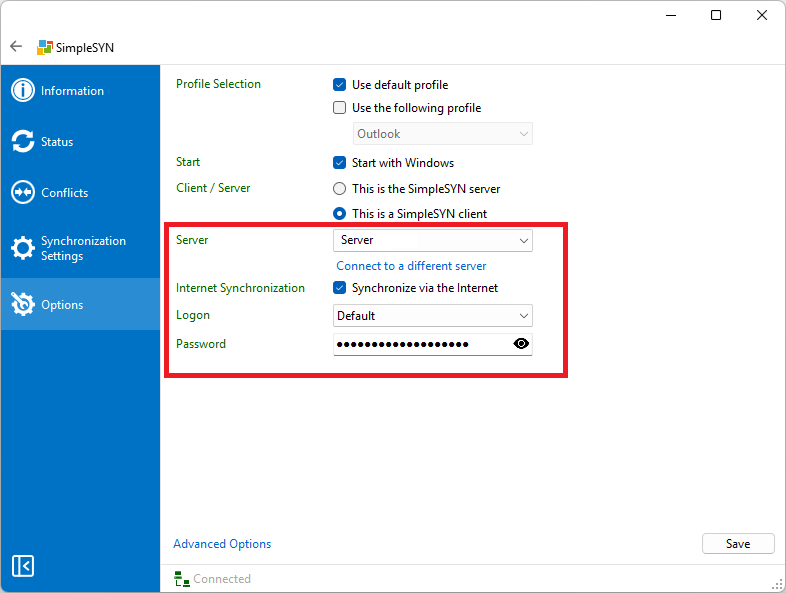 Image 6: SimpleSYN client-settings
Server
In the “Server” dropdown menu, all available SimpleSYN servers in the local network are displayed. Additionally, servers that have been found via a server ID or an invitation file will also appear here. Select the server that the SimpleSYN client should synchronize with.
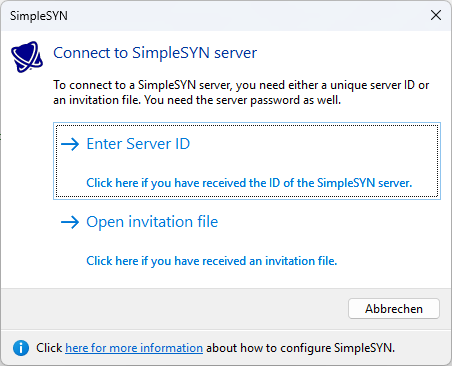
Connect to a different server
If your SimpleSYN server is not available in the same local network, the connection must be established using a server ID or an invitation file.
To do this, click “Connect to a different server.”
- Connecting via Server ID
- If you have received a Server ID from the SimpleSYN server, click “Enter Server ID” and enter the ID into the corresponding field. The server information will then be retrieved automatically and displayed in the “Server” dropdown list.
 I
I
Image 7: Connect to a SimpleSYN-server
- If you have received a Server ID from the SimpleSYN server, click “Enter Server ID” and enter the ID into the corresponding field. The server information will then be retrieved automatically and displayed in the “Server” dropdown list.
- Connecting via Invitation File
- If you have received an invitation file, click “Open invitation file” to load it. The SimpleSYN server data will then be automatically added to the “Server name” dropdown list.
Internet Synchronization only SimpleSYN Business
If you want to synchronize your data not only within the local network (LAN/Wi-Fi) but also over the Internet, activate the checkbox “Synchronize via the Internet.” This allows SimpleSYN clients to connect to the server even when they are outside your local network.
Logon
In the “Logon” dropdown list, you can define the type of authentication for SimpleSYN. Select the login type that you have also configured on the SimpleSYN server. By default, SimpleSYN uses the “Default” type, where the settings are identical for all SimpleSYN clients.
User Name, Domain and Password
Depending on the selected authentication type, different input fields will be displayed.
Enter your login credentials in the fields “User Name” “Domain,” and “Password.” These credentials were defined during the setup of the SimpleSYN server.
By default, SimpleSYN uses the “Default” authentication type. In this case, only the password needs to be entered.