Security
Applies to version: Version 5.x, Version 6.x
SimpleSYN is very concerned by the security of your Outlook® data. The communication of SimpleSYN is always highly encrypted. SimpleSYN uses TLS and SSL respectively to secure the connection between the SimpleSYN client and server. No Outlook data is stored on external servers (cloudless syncing).
Additionally it is possible to authenticate and authorise the SimpleSYN client through a user name and password. It is thus possible to realise different security access levels for different users.
SimpleSYN allows sharing every Outlook® folder separately, so that the SimpleSYN server or SimpleSYN client can only see and synchronize the Outlook® folders that have been selected explicitly beforehand. Thus it is possible to exclude an Outlook® folder with private data easily from synchronization.
 If the the default settings all Outlook® folders are shared.
Authentication and Authorization
SimpleSYN is configured in a way that only authorized users can synchronize. SimpleSYN contains multiple authentication methods to allow different usage scenarios. The authorization is based on SimpleSYN internal users, local Windows® user accounts or Windows® domain user accounts.
Default logon
In the default configuration SimpleSYN uses the logon type “Default”. In this case the special user account “All users” will be used. With this account all users will share the same settings. This configuration only uses a password for authentication.
SimpleSYN logon
SimpleSYN has an integrated user management. It uses user names and passwords for log-on.
Windows logon
Alternatively to the integrated user management it is possible to log-on SimpleSYN clients with the currently signed-up Windows® user or any Windows® user account to the SimpleSYN server. Either domain user accounts or local user accounts can be used.
If local Windows® user accounts or domain user accounts are being used they have to have a password. Otherwise it is impossible to use said user account for log-on through the network.
Configuration of security settings – SimpleSYN server
If SimpleSYN is configured as a SimpleSYN server, open SimpleSYN and click on “Synchronization Settings”. Click on “Manage Users” to open the SimpleSYN user management.
In the user management it is possible to create integrated SimpleSYN user accounts or to provide Windows® user accounts in SimpleSYN. All existing SimpleSYN users and their attributed Windows® user accounts are being shown here. Under “Used by” is shown which SimpleSYN client is using a specified user.
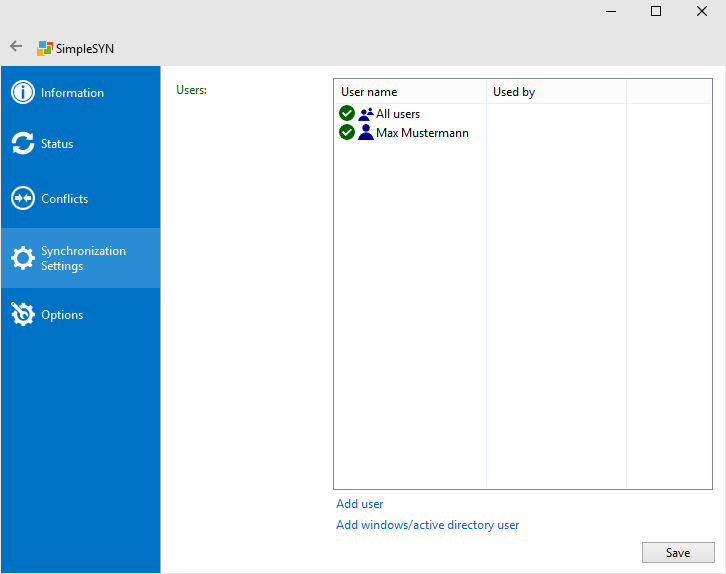 Image 1: SimpleSYN server user management
The user account “All users” allows anonymous access to the SimpleSYN server; only the password is required in this case. If only selected users are supposed to be able to log-on deactivate or delete the user account “All users”.
A symbol in front of the user shows whether the user is activated or deactivated. Is a user deactivated a log-on to the SimpleSYN-server is impossible for said user.
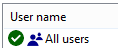 Image 2: User activated
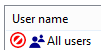 Image 3: User deactivated
 All modifications will only be adopted after a click on “Save”. Click on “Back” or leave the options through another menu point to discard made modifications to the settings.
Add user
Click on “Add user” to create a new SimpleSYN integrated user, or click on “Add Windows- / Active-Directory-user” to use an existing local Windows® user account or a domain user account as SimpleSYN log-on.
Add SimpleSYN-user
Enter a unique user name and password to create an integrated user account. Confirm the dialog with “OK”.
 Image 4: Add user
 It is only possible to use local Windows® user accounts that have a password.
To use a local Windows® user account or a domain user in SimpleSYN select the user account through the standard windows dialog.
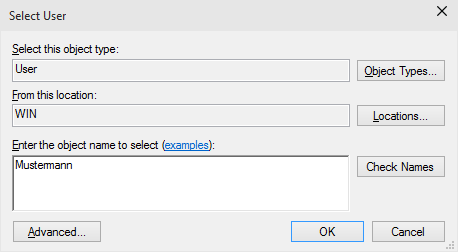 Image 5: Assign user account
Disable / enable users
To activate or deactivate a user account right click the according user account and select “Disable” or “Enable”.
Only activated users can log onto the SimpleSYN server.
Edit users and change passwords
To edit an integrated SimpleSYN user double click on the user or right click and select the menu item “Properties”. In the following dialog it is possible to change the user name or give a new password.
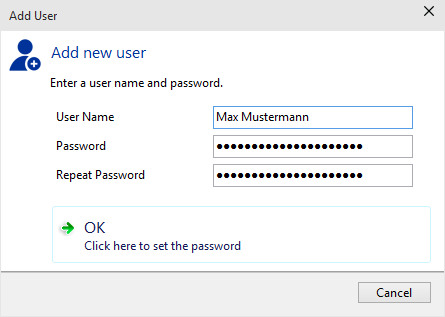 Image 6: Edit user
Should the selected user account be a local Windows® user account or a domain user account it is possible to select another user account.
Delete user
To completely delete a user right click the user and then on “Delete user”.
Configuration of security settings – SimpleSYN client
If SimpleSYN is configured as a SimpleSYN client, open SimpleSYN and click on “Options” to configure the security settings.
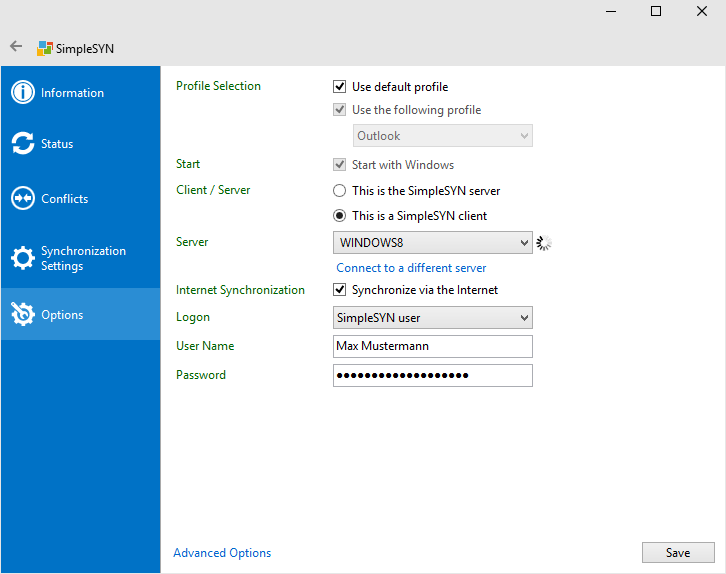 Image 7: Client security settings
Save the entries with a click on “Save”. Click on “Back” or exit the options through another menu entry to discard the settings.
Logon
In the drop-down list “Logon” select the authentication type that correspond to the user account on the SimpleSYN server.
- Default
Select the authentication type “Default” to use the special user account “All Users”. In this case authentication requires a password only. Enter the SimpleSYN server password in the field “Password”. - SimpleSYN user
If you have created an integrated SimpleSYN user on the server, select the authentication type “SimpleSYN user”. Enter the log-on data of the integrated SimpleSYN user into the fields “User Name” and “Password”. - Windows user / Logged on Windows user
If a Windows® user account or domain user account has been added on the SimpleSYN server and it is supposed to be used for log-on select “Windows user” and “Logged on Windows user” respectively. Enter the log-on data of the user into the fields “User Name”, “Password” and “Domain”. - If you select “Logged on Windows user” no additional log-on information is required.
If the authentication type “Windows (current user)” is selected the current user accounts needs to be known to the SimpleSYN server. If it is a local Windows® user account, a user account with identical name and password has to exist on the SimpleSYN server computer.
If a local Windows® user account is being used the field “Domain” is equal to the computer name of the SimpleSYN-server computer.
Should the log-on to the SimpleSYN server fail with the current settings the SimpleSYN client will also prompt the entry of log-on data.
Set available Outlook® folders
To confine the Outlook® folders for each synchronization partner, proceed as followed.
SimpleSYN has been configured as SimpleSYN server
If SimpleSYN has been configured as SimpleSYN server, click on “Synchronization settings” to open the folder selection.
Select the user whose settings are to be changed under “Current user”.
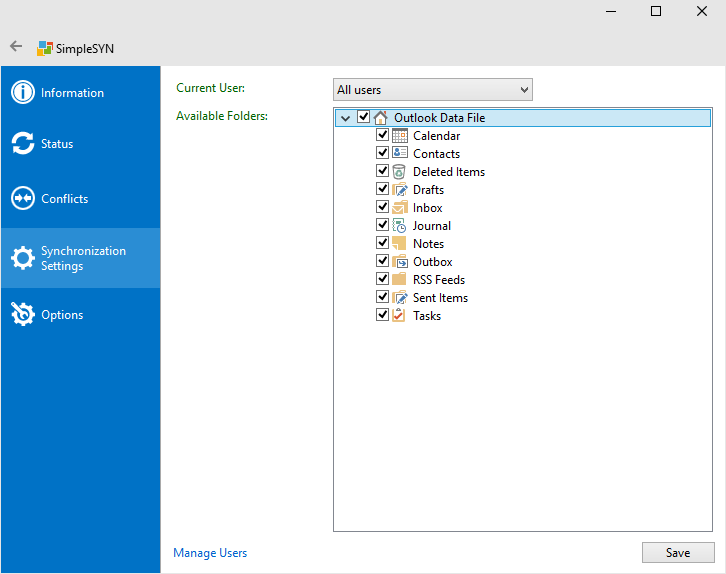 Image 8: Select available folders
Available folders
From the list of Outlook® folders, choose the folders available for synchronization with the selected user. All Outlook® folders with an active checkbox will be available. All other folders will be invisible.
Right click on the list of Outlook® folders, to open a context menu. Check the menu item “Allow new folders”, to allow the SimpleSYN clients to create new Outlook® folders below already allowed folders.
All modifications will only be adopted after a click on “Save”. Click on “Back” or leave the options through another menu point to discard made modifications to the settings.
SimpleSYN has been configured as SimpleSYN client
If SimpleSYN has been configured as SimpleSYN client, click on “Synchronization settings” and afterwards on “Advanced client settings” to limit the visible Outlook® folders for the SimpleSYN-server.
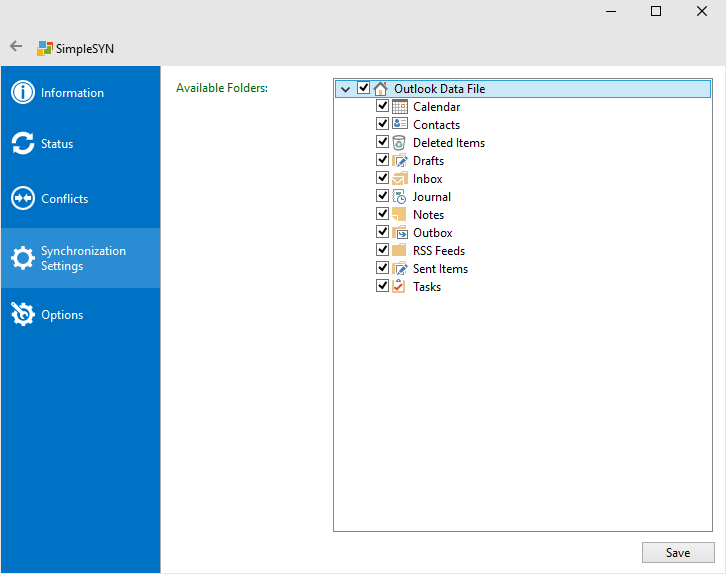 Image 9: Limit available folders
From the list of Outlook® folders, choose the folders available for synchronization with the SimpleSYN-server. All Outlook® folders with an active checkbox will be available. All other folders will be invisible.
Right click on the list of Outlook® folders, to open a context menu. Check the menu item “Allow new folders”, to allow the SimpleSYN server to create new Outlook® folders below already allowed folders.
All modifications will only be adopted after a click on “Save”. Click on “Back” or leave the options through another menu point to discard made modifications to the settings.