Synchronization
Applies to version: Version 2.x / 3.x
After SimpleSYN Mobile has been set up and a connection between SimpleSYN Mobile and the mobile device has been established, synchronization can be started. All Outlook® folders that you have selected in the “Configuration” section are available for synchronization with the mobile device.
Additionally, please make sure that synchronization for the desired items is enabled in the settings of the SimpleSYN Mobile account on the mobile device (see example).
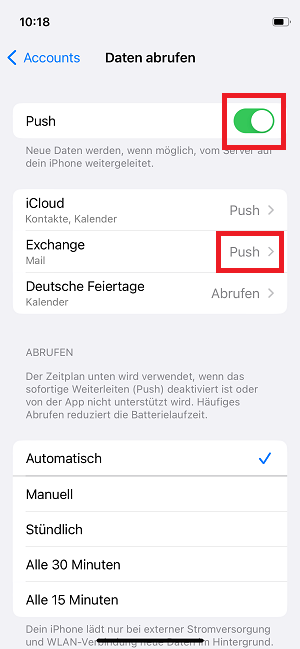
 Figure 1: On your mobile device, you can choose what data you want to sync
Which apps are required?
You do not need any additional apps on the mobile device, not even the Outlook app (not supported).
Use the integrated standard apps of the respective system on your mobile device:
| For | Android | Apple iOS / iPadOS |
|---|---|---|
| Emails | Gmail app | Apple Mail app |
| Tasks | Gmail app | Apple Reminders app |
| Appointments | Google Calendar app | Apple Calendar app |
| Contacts | Google Contacts app | Apple Contacts app |
| Notes | Android devices do not provide a built-in default app for managing notes. Please use a third-party app on your Android device. |
Apple Notes app |
When does the synchronization take place?
The synchronization of the data can either be triggered manually on the mobile device or the data synchronization can be done automatically at certain time intervals or by "push". The synchronization via push is usually immediate but leads to an increased battery load on your device. To reduce the load on the battery, even with push, the synchronization is triggered immediately only for new items. For changed or deleted items, push can delay up to 15 minutes. The automatic update interval depends on the manufacturer and system of the end device.
How to enable push on iOS
- Open settings of your Apple iOS device.
- iOS version 12 and 13: Tap “Passwords & Accounts”
iOS / iPadOS version 14, 15, 16 and 17: Tap “Mail”, “Contacts”, “Calendar”, or “Notes” and then tap “Accounts”.
iOS / iPadOS version 18, 26: Open Apps, Tap „Mail“, „Contacts“, „Calendar“ or „Notes“ and then tap “Accounts”. - Tap “Fetch new Data” at the bottom.
- Enable Push if it is not already activated.
- Make sure that Push is selected for the SimpleSYN Mobile Exchange account (not 'Fetch' or 'Manual')."
How to enable push on Android
The names of the menu items may differ slightly depending on the Android version and manufacturer.
- Open the settings of your Android device.
- Tap “Accounts and Backup”.
- Tap “Manage Accounts”.
- Under "Manage Accounts," tap your created SimpleSYN Mobile Exchange account (@simplesyn.app).
- Tap “Account settings”.
- Tap your created SimpleSYN Mobile Exchange account again.
- Tap “Sync frequency”.
- In “Sync frequency” select “Automatic (Push)”.
Manual synchronization
Alternatively, you can also initiate a manual synchronization. The data is synchronized immediately in this case.
Apple iOS
For example, you can trigger a manual sync in Apple iOS via the "Pull Down" gesture in the respective app (e.g., Calendar, Mail).
Example:
If you want to manually sync the calendar on iOS, first open the Calendar app. Then switch to the list view and perform the pull-down gesture. A spinning sync icon will appear, indicating that the synchronization process has started.
Android
On Android, manual data synchronization can be done in the menu of the respective app by tapping "Refresh", or by the “Pull Down” gesture.