Advanced options
Applies to version: Version 7.x
Open the 'Options' menu and then select 'Advanced Options' to access additional settings in SimpleSYN.
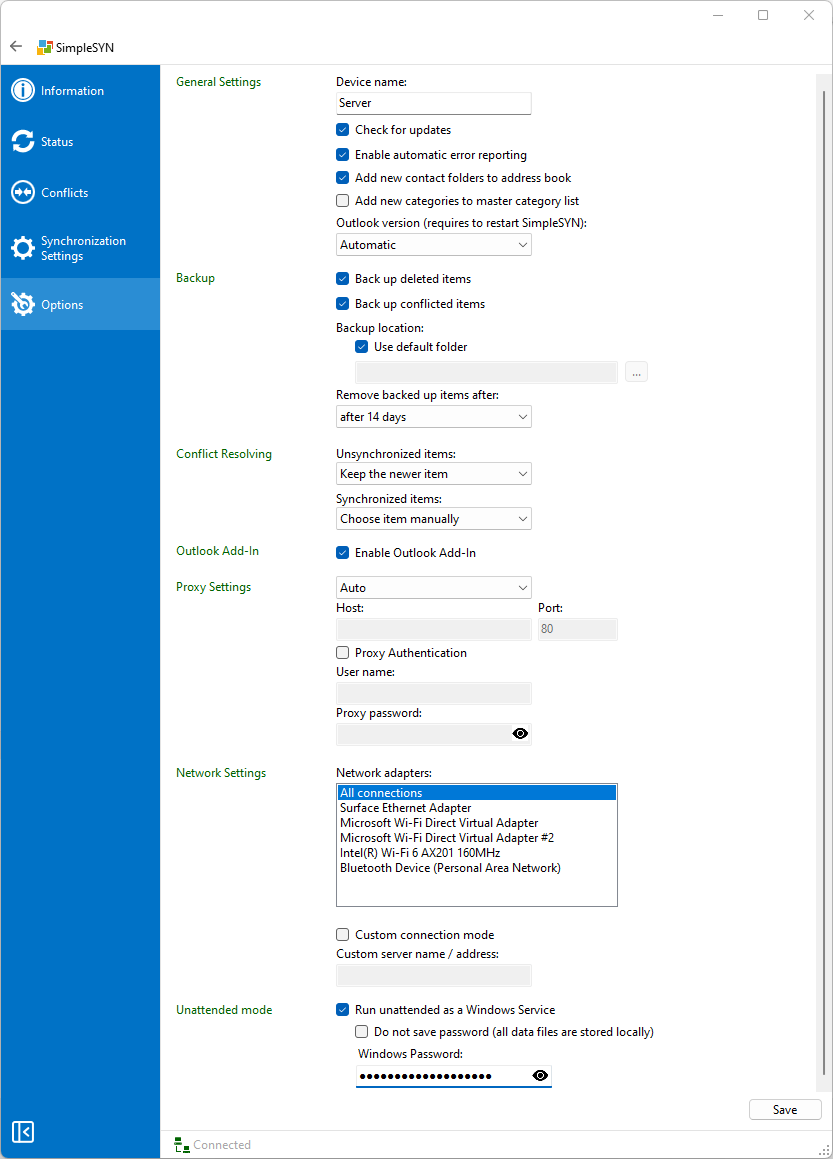 Image 1: advanced options
General settings
Device name
The device name is used for internal identification of the SimpleSYN client or server. It is shown, for example, in the “Status” section. By default, SimpleSYN uses the name of the current computer as the display name.
Check for updates
Enable the “Check for updates” option to be regularly informed about new versions of SimpleSYN. When activated, SimpleSYN checks approximately every 24 hours for available updates. If this option is disabled, updates must be checked manually.
Enable automatic error reporting
If you enable the “Enable automatic error reporting” option, SimpleSYN may automatically send a report to the development team in case of crashes or other errors. These reports help identify and fix issues more quickly and improve the software continuously.
Please also note our privacy policy at: https://www.simplesyn.net/en-US/data-protection-policy#software
Add new contact folders to the Address Book
If this option is activated, newly created contact folders are automatically added to the Outlook® address book.
Add new categories to master category list
If this option is activated, SimpleSYN checks during synchronization whether all categories used in items exist in the master category list. If not, SimpleSYN adds the category name to the master list with a default color. You can manually adjust the color to match the settings on other PCs.
Outlook version
By default, SimpleSYN automatically detects the installed version of Outlook. If multiple versions are installed in parallel, you can select the desired version here. Please note that a restart of SimpleSYN is required after making changes.
Backup
Back up deleted items
With SimpleSYN default settings, deleted items are being moved by SimpleSYN into a hidden backup folder of the Outlook® data file. If this option is not activated deletions are no longer backed up.
Back up conflicted items
If this option is activated SimpleSYN saves a copy of the items having caused a conflict in the backup Outlook® folder.
Backup location
Here it is possible to specify whether deleted items are being moved into the standard backup folder, or into another folder. By default the backup folder for deleted items is not visible in Outlook® but can be shown by using the SimpleSYN Outlook® Add-In.
Remove backed up items after
Here you can specify the period of time after which the items are to be permanently removed from the backup folder.
Conflict resolution
In this section, you define how SimpleSYN should handle synchronization conflicts – both for unsynchronized items (e.g., during the initial synchronization) and for already synchronized items that have been modified on multiple devices.
More information about conflicts can be found here.
Manuel conflict resolution (a conflict message is displayed)
- Choose item manually
Each conflict must be resolved manually in the “Conflicts” section.
Automatic conflict resolution (a conflict message is not displayed)
- Keep the newer item
In case of a conflict, the newest item is automatically used (based on the local time of the devices) and the older item is overwritten. - Ignore changes
Both versions of the item are retained and treated as equivalent. No synchronization is taking place. - Keep both items
The item is duplicated so that both versions are retained. - Always keep server item
In case of a conflict, the version from the server is always used and the version from the client is overwritten. - Always keep client item
In case of a conflict, the version from the client is always used and the version from the server is overwritten.
Outlook Add-In
When the option “Enable Outlook Add-In” is activated, the SimpleSYN Add-In will be displayed within Microsoft Outlook. The Add-In provides various additional features, but it is not required for automatic synchronization. Synchronization will continue to run in the background even if the Add-In is disabled.
Proxy Settings
SimpleSYN supports the use of HTTP proxy servers. If a proxy server is used in your network, SimpleSYN will automatically detect it and use it for the connection.
You also have the following options:
-
Disable automatic proxy detection:
If you prefer that SimpleSYN does not automatically detect the proxy server, you can manually disable this feature. -
Manual proxy configuration:
Alternatively, you can manually configure SimpleSYN to use your HTTP proxy server by entering the required credentials and settings.
This flexibility allows SimpleSYN to operate reliably even in complex network environments with specific security or routing requirements.
Network Settings
Under “Network Adapter”, you can specify which adapter SimpleSYN should use for the connection. By default, SimpleSYN checks all available network connections and automatically uses the first adapter that successfully establishes a connection.
Using SimpleSYN in a local network without internet access:
If you want to use SimpleSYN exclusively within a local network — for example, because there is no internet connection or outgoing TCP connections are blocked — you can configure a custom connection.
Follow these steps:
- On all participating PCs (both server and clients), enable the option “Custom connection mode”.
- On all client PCs, enter the computer name or the static IP address of the PC running SimpleSYN as the server in the field “Custom server name/address”.
Windows Service only SimpleSYN Business
When the option “Start as Windows Service” is enabled, SimpleSYN will automatically start in the background when Windows starts – even if no user is logged into the system.
If your Outlook data files are stored locally (i.e., not on a network drive), you can enable the option “Do not save password”. In this case, no Windows password is required.
However, if the data files are located on a network drive, SimpleSYN needs access to the user account. In this case, enter the current Windows password of the corresponding user in the “Windows Password” field to ensure the service can properly access the network resources.