Synchronization settings
Applies to version: Version 7.x
In this section, you can configure the type of synchronization in detail. The available options under “Synchronization Settings” depend on whether SimpleSYN is set up as a server or a client.
The computer has been configured as a SimpleSYN-client
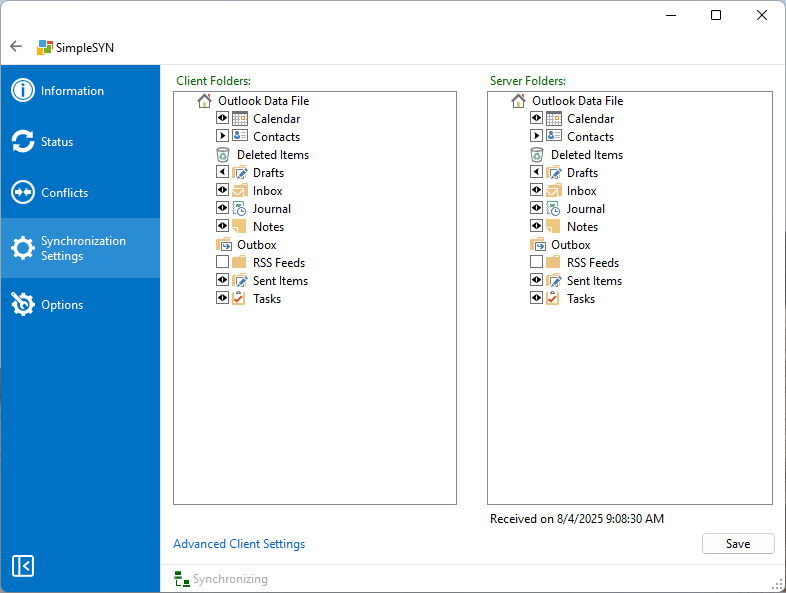 Image 1: synchronization settings
If SimpleSYN is configured as a client, you can specify in the synchronization settings which Outlook® folders should be synchronized automatically.
- Left side: Displays the folder structure of your client PC.
- Right side: Displays the folder structure of the SimpleSYN server.
Selection of the Outlook® folders for automatic synchronization
Folder Selection and Synchronization Display
To enable automatic synchronization for an Outlook® folder, simply click the checkbox next to the desired folder—either on the client or server side. Once a folder is selected, SimpleSYN automatically highlights the corresponding target folder on the opposite side.
The synchronization direction is indicated by an arrow icon within the checkbox and can be adjusted flexibly by clicking it multiple times—for example, to set one-way or two-way synchronization. This allows you to maintain a clear overview of which folders are being synchronized and how.
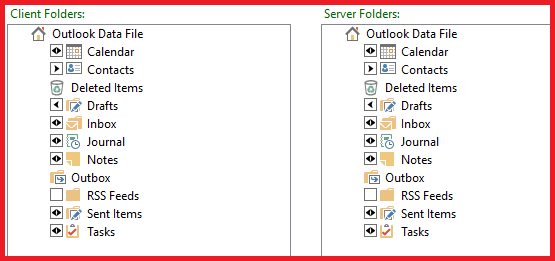 Image 2: folder selection
SimpleSYN continuously monitors all selected Outlook® folders. As soon as changes occur—such as new appointments, deleted items, or moved content—they are automatically synchronized without the need for any manual intervention.
Setting the Synchronization Direction
The arrows within the checkbox indicate the current synchronization direction:
- A single arrow from client to server means data is transferred from the client to the server
- An arrow from server to client indicates the opposite directio
- Double arrows represent bidirectional synchronization.
You can set the desired synchronization direction by clicking the checkbox multiple times.
| Synchronization Direction | Description |
|---|---|
| Bidirectional Synchronization (Client <> Server) |
The Outlook® folder is synchronized both from the client to the server and from the server to the client. |
| One-Way Synchronization (Client > Server) |
The Outlook® folder is synchronized only from the client to the server. |
| One-Way Synchronization (Client < Server) |
The Outlook® folder is synchronized only from the server to the client. |
Automatic Folder Creation and Subfolder Synchronization
Automatic Creation of Missing Folders
When you select an Outlook® folder on either the client or server side that does not yet exist on the opposite side, SimpleSYN automatically creates the missing folder. Until the first synchronization, it is marked with a “plus” symbol to indicate that it has been newly added.
Synchronization of Subfolders
By default, subfolders of a selected Outlook® folder are also included in the synchronization. They automatically inherit:
- the synchronization direction of the main folder,
- and its other synchronization settings.
Changes to the folder structure—such as creating, deleting, or renaming subfolders—are also synchronized automatically.
Manually Include or Exclude Subfolders
If you don’t want to synchronize all subfolders or only want to select specific ones, follow these steps:
- Right-click the desired main folder.
- In the context menu, deselect the option “Synchronize subfolders” to disable automatic selection.
- You can then manually select individual subfolders for synchronization.
Context menu
Right-click an Outlook® folder to access advanced configuration options. The context menu allows you to define in detail which synchronization method should be used for the selected folder.
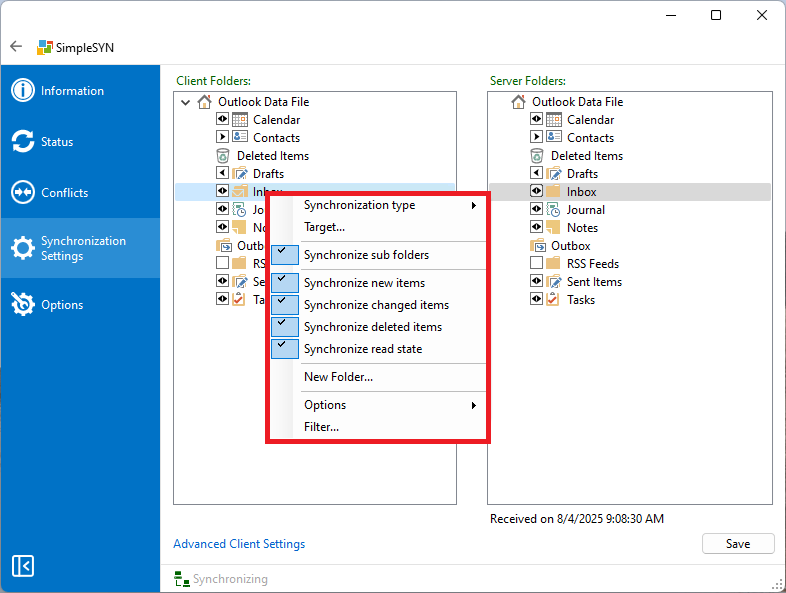 Image 3: shortcut menu
Description of the Individual Sections
Synchronization type
Here it is possible to indicate the synchronization direction. The synchronization direction is also being shown through arrows in the checkbox in front of the according folder.
Tip: You can also apply this setting to a data file. In this way you can automatically set the synchronization direction for all folders of a data file.
Target...
If you want to synchronize an Outlook® folder with a specific folder on the target computer, select “Target Folder…”. In the following dialog, choose the destination folder for synchronization.
Click “New…” to create a new Outlook® folder on the target computer.
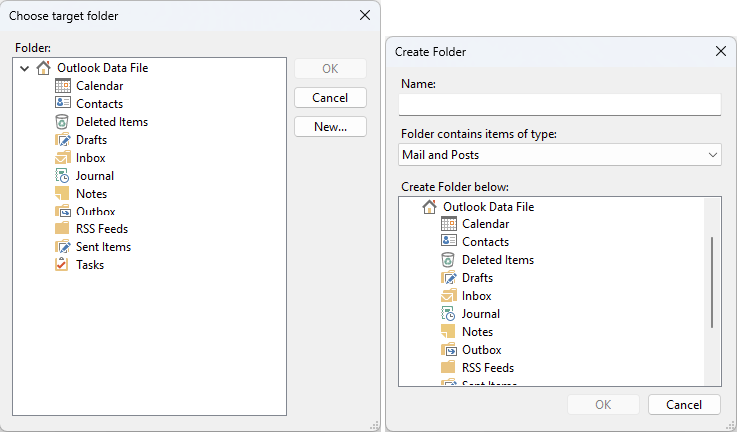 Image 4: select target folder and create new folder
Synchronize subfolders
When enabled, all subfolders of the selected main folder are automatically created, modified, or deleted. They inherit the synchronization direction and settings of the main folder.
Synchronize new items
When enabled, any newly created item in this folder is automatically synchronized with the target folder.
Synchronize changed items
When enabled, all changes to existing items in this folder are automatically synchronized.
Synchronize deleted item
When enabled, deleted items are also removed from the target folder, ensuring both folders remain identical.
Only deletions of previously synchronized Outlook® items are synchronized.
Synchronizing read state
When enabled, the read/unread status of an item is synchronized between client and server. This ensures that the status of your emails remains consistent across all devices.
New folder...
Use the “New Folder...” button to create a new Outlook® folder directly in the folder view. This folder can then be selected for synchronization.
Options only SimpleSYN Business
| Bereich | Option | Description |
|---|---|---|
| Reminders | Don`t synchronize | If enabled, any changes made to reminders from the other side will not be applied. I.e. reminders are not created, changed or closed. Reminders will not be added to new items. |
| Don`t close or snooze | If enabled, closing a reminder or snoozing it again will not apply. This means that reminders are taken over from the other side, i.e. created or changed, but only closed locally. | |
| Read state | Set new items to read | When enabled, new items are always marked as read. This means that new elements are synchronized and the read status is automatically marked as read locally. |
| Set new items to unread | When enabled, new items are always marked as unread. This means that new elements are synchronized and the reading status is automatically marked locally as unread. | |
| Set updated items to read | When enabled, updated items are always marked as read. This means that for elements that already exist and have been updated, the read status is automatically marked as read locally. | |
| Set updated items to unread | When enabled, updated items are always marked as unread. This means that for elements that already exist and have been updated, the read status is automatically marked locally as unread. | |
| Categories | Don`t synchronize | If enabled, categories from other sites will not be synced. I.e. categories for an element are not created or changed. Categories are not added to new items. |
Refresh
Reloads the folder list. Click on “Refresh” to adopt newly created or deleted folders. The click on “Refresh” on the server side of the folder list initializes the exchange of folder information. For this a SimpleSYN-server needs to available.
Filter... only SimpleSYN Business
Click on “Filter…” to filter the synchronization of the folder. In this way it is possible to exclude private items from the synchronization. More information about the filters can be found here.
The computer has been configured as a SimpleSYN-server
If SimpleSYN is configured as a SimpleSYN-server more information about the synchronization settings can be found in the chapter “Set available Outlook® folders” here.